Move from one case to the next.
|
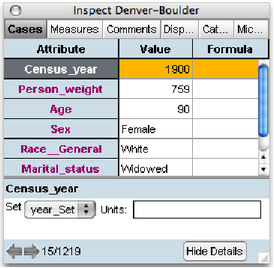
Click the left or right arrows at the bottom left of the panel.
|
Move to the next or previous selected case.
|
Press Ctrl (Win) Option (Mac) while clicking the left or right arrow button.
|
Edit a value.
|
Click in the cell that contains the value you want to edit.
|
Edit an attribute’s formula.
|
Double-click the formula cell for the attribute.
|
Change the width of columns.
|
In the column header area, drag the boundary between columns.
|
Change the height of rows.
|
In the row header area, drag the boundary between rows.
|
Use an attribute in a graph or summary table.
|
Position the mouse pointer over the attribute name. Drag the attribute from the inspector and drop it on the desired place in the graph or summary table.
|
Rename an Attribute in a Collection’s Inspector.
|
Double-click the attribute name and type a new name.
|
Add an Attribute to a Collection.
|
Click in the <new> cell at the bottom of the list of attributes. Type the name of the new attribute. See Tips for Naming Attributes.
|
Delete an Attribute in an Inspector.
|
Right-click (Win) Ctrl-click (Mac) to bring up a context menu and choose .
|
Change the order of attributes.
|
Drag an attribute up or down, paying attention to the highlighting that indicates where the attribute will be placed when you release the mouse.
|
Add cases to the collection.
|
Right-click (Win) Ctrl-click (Mac) to bring up a context menu and choose.
|
Manage Units in the Collection’s Inspector.
|
Click the button. Select the attribute. Type the name of the desired unit in the Units field or change the unit that is there.
|
Create a Category Set from Existing Values.
|
Click the button, and select the attribute. Choose from the pop-up menu.
|
Create a New Category Set and Apply It to an Attribute.
|
Click the button, and select the attribute. Choose the name of the desired category set from the pop-up menu.
|
Remove a Category Set from an Attribute.
|
Click the button, and select the attribute. Choose from the pop-up menu.
|