Timing with Photogates
Suppose you want to measure precisely how long it takes an object to travel a certain distance. You could use a stopwatch, but you would have a lot of reaction-time error. When a photogate’s light is blocked, it triggers a time with an error of less than a millisecond. In this tutorial, you’ll set up a pair of photogates to make this measurement.
You’ll need:
- Two Vernier Photogates.
- An Experiment: For our experiment, we have a ramp with a ball at the top ready to roll down the ramp. The ball will roll through first one photogate and then another. The triggering of these photogates will enable Fathom to measure the time it takes for the ball to travel between them.
Your experimental setup does not need to be a ball rolling down a ramp. Anything that will block one photogate and then the other will be fine.
Photogate Meters
Make sure the LabPro device is plugged into the USB port of the computer.
Sometimes you may notice that the photogate meter choice does not appear at the top of the menu even though a photogate probe is connected. This is because the older Vernier photogates do not provide auto-identification.
1. In a new Fathom document, make two photogate meters and an empty collection.
2. Connect each meter to the collection.

When photogate meters are created, they automatically get assigned to the digital channels on the LabPro: the first photogate meter to the first channel, and the second meter to the second channel.
3. Block one of the photogates (using your hand or any other object) and notice which of the meters changes.
The meters are automatically named Gate1 and Gate2, corresponding to a LabPro channel.
To measure the transit time between the two photogates, the experiment must record the time at which first is blocked and the time at which second is blocked as a single case.
Configuring the Experiment Collection
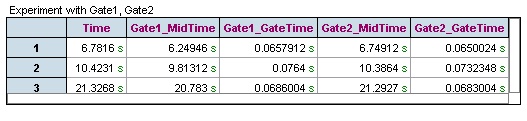
4. Make a case table for the experiment collection.
Notice that there is an attribute for time and one each for the midtimes and gate times for each gate. These correspond to the middle of the time for which each gate was blocked (this is an offset in seconds from the start of the experiment at 0 seconds) and the duration for which it was blocked.
5. You need to set the experiment to be triggered by the clearing of the photogate.
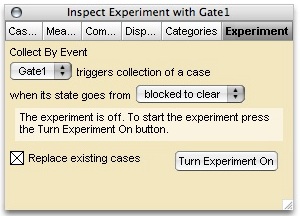
6. Click the experiment collection’s icon to show its inspector.
7. Set the experiment to trigger collection of a case based on Gate1 going from blocked to clear.
Collecting Data
Everything should be ready to collect data from the photogates.
8. Click the Turn Experiment On button in the experiment’s inspector.
9. Move the object (e.g., the ball on the ramp) through the two photogates.
10. You should see a new case appear in the experiment’s case table.
Until you press the Turn Experiment Off button, each time you move the object through the two photogates, a new case gets generated in the experiment collection.
Data Analysis
Compute the transit time as the difference of the times at which the photogates were blocked, and the velocity as the distance between the photogates divided by the transit time.
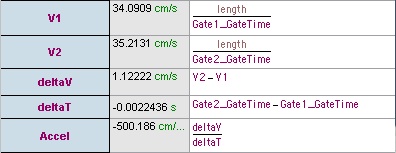
In a real experiment, there will be some other information to record for each measurement, something on which the transit time or velocity depends. For example, with the ball rolling down the ramp, it might be that the angle of the ramp is varied or that the distance of the ball from the first photogate is changed. The length of the object rolling through the photogate is an important measurement to compute the velocity of the object.
Explore More
- Try out the other possibilities for what to collect by changing the meters’ inspectors.
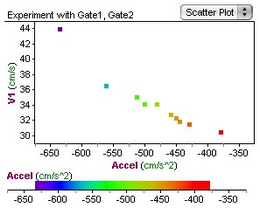
- See if you can set up the two photogates to directly measure the acceleration of gravity.